| Issue |
Matériaux & Techniques
Volume 111, Number 4, 2023
Special Issue on ‘Indentation advances in experiments and modelling’, edited by Florian Lacroix, Olga Smerdova and Eric Le Bourhis
|
|
|---|---|---|
| Article Number | 404 | |
| Number of page(s) | 16 | |
| Section | Joining and assembly | |
| DOI | https://doi.org/10.1051/mattech/2023034 | |
| Published online | 19 December 2023 | |
Original Article
Experimental study of both bending moment and preload effect on the stress cycle upon bolts in a tee-stub
Etude expérimentale du moment de flexion et de l’effet de la précharge sur le cycle de contrainte des boulons dans un tronçon en té
1
Ecole Polytechnique de Thiès, BP A10 Thiès, Sénégal
2
Université Clermont Auvergne, CNRS, Clermont Auvergne INP, Institut Pascal, F-63000 Clermont-Ferrand, France
* Corresponding author: This email address is being protected from spambots. You need JavaScript enabled to view it.
Received:
2
October
2023
Accepted:
27
November
2023
Abstract
The experimental study exposed in this paper aims to exhibit the effect of the bending moment and the preload on bolts. A bolted tee-stub connection defined in Eurocode 3, part-1–8, is used. The flanges of the tee-stubs are taken from IPE400 and HEB 320 beams. The HR-M12-10.9 bolts are used and are equipped with four strain gauges each. The strains measured lead to calculate the axial load and the bending moment in the bolts. Six different configurations of the tee-stub are tested. For each configuration, four preload values have been studied. These tests provided an opportunity to take a critical look at the true value of the axial force and the bending moment in the bolt. We noted the existence of out-of-plane bending moment. Despite the existence of out-of-plane bending, it was seen through the results that the increase in the preload value causes a reduction in the amplitude of the stress cycle on the bolt. The percentages of the reduction due to the preload are greater for rigid flanges and smaller for flexible ones. As the amplitude of the stress is the main fatigue failure factor, its reduction shows that preload is beneficial for the fatigue resistance of such joints.
Résumé
L’étude expérimentale exposée dans cet article vise à montrer l’effet du moment de flexion et de la précharge sur les boulons. Une liaison boulonnée en T définie dans la partie 1.8 de l’Eurocode 3 est utilisée. Les semelles du tronçon en té sont issues des poutres IPE 400 et HEB 320. Les boulons HR-M12-10.9 sont utilisés et sont équipés chacun de quatre jauges de déformation. Les microdéformations mesurées permettent de calculer la charge axiale et le moment de flexion dans les boulons. Six configurations différentes du tronçon en té sont testées. Pour chaque configuration, quatre valeurs de précharge ont été étudiées. Ces essais ont permis de porter un regard critique sur la véritable valeur de l’effort axial et du moment de flexion dans le boulon. Nous avons noté l’existence d’un moment de flexion hors plan. Malgré l’existence de flexions hors plan, il a été constaté à travers les résultats que l’augmentation de la valeur de précharge entraîne une réduction de l’amplitude du cycle de contrainte sur le boulon. Les pourcentages de réduction dus à la précharge sont plus élevés pour les semelles rigides et plus faibles pour les semelles flexibles. Comme l’amplitude de la contrainte est le principal facteur de rupture par fatigue, sa réduction montre que la précharge est bénéfique pour la résistance à la fatigue de ces assemblages.
Key words: Bolted tee-stub / preload / equipped bolts / bending moment / amplitude of stress cycle / fatigue
Mots clés : Liaison boulonnée en T / précharge / boulons équipés / moment de flexion / essais expérimentaux / amplitude du cycle de contrainte / fatigue
© A.B. Camara et al., 2023
 This is an Open Access article distributed under the terms of the Creative Commons Attribution License (https://creativecommons.org/licenses/by/4.0), which permits unrestricted use, distribution, and reproduction in any medium, provided the original work is properly cited.
1 Introduction
Metal structures essentially consist of a set of elements such as columns and beams. For both aesthetic and economic reasons, the demand of bolted connections in steel building frames has increased in recent years. However, the bolted connection between a beam and a column in a steel portal frame structure still raises design questions especially when it is subjected to dynamic loadings [1]. A bolted beam-to-column assembly usually ensures the connection between the column flange and the end plate. The analytical approach, based on the component method, aids to define the mechanical behaviour of the connection. The European standard EN 1993 part 1–8 uses the latter one to define the stiffness and strength of the connection using the tee-stub for the study of the tensile zone [2]. The component method consists in decomposing the bolted beam-to-column connection into its elementary components among which the most important one is the equivalent tee-stub in the tension zone [2–5]. Since 1974 several researchers have been interested in the numerical and experimental study of the tee-stub. As far as the numerical study of tee stub is concerned, Cameron in 1988 [6] numerically studied extended end-plate connections incorporating eight tension region bolts arranged in four rows. This research was undertaken to verify existing design methods incorporating large-sized beams and heavy material, to establish validity of a simplified model, and to examine effects of partially pre-stressed bolting. Al Khatab [4] and Abidelah et al. [5] also studied through a numerical simulation the column-beam connection (tee-stub) without preload in the bolt in order to better understand the behaviour of the latter under static loading. Other researchers like Bezerra et al. [7], Bai et al. [8], and Ahmed et al. [9] also carried out numerical finite elements studies of a tee-stub with prying effects consideration.
For the experimental study of tee stub, Zoetemeijer [3] and Cameron [6] did interesting studies on it. In 2003, Ciutina [10] experimentally studied a connection between a column and a beam under seismic loading. This experimental study aimed to find the appropriate constructive layouts for an improved ductile behaviour of the steel and composite end-plate beam-to-column connections under seismic loading. This study allowed them to compare the experimental results with those of the standards and to propose some recommendations and simple formulae for a better dissipative behaviour. In order to analyze the fatigue behaviour of the bolt, Farés [11] studied numerically and then experimentally a bolted connection with symmetrical flanges and four bolts in 2006. The assembly studied by Farés resembles a tee-stub. The finite element model has provided him results in accordance with his experimental findings. More recently, Saranik et al. [1],Wang et al. [12], Helen et al. [13] and Yanzhi et al. [14] have studied the experimental fatigue behavior of bolted connection.
The experimental analyses on tee-stub we found do not take into account the out-of plane bending in the bolts, that is to say the bending around the minor axis of the tee-stub. Thus, it is proposed in this paper to experimentally study a tee-stub where each bolt is instrumented with 4 strain gauges allowing the relative strains assessment. These relative strains allow to calculate on one hand the axial force in the bolts (FB) and on the other hand both in-plane bending moment (My) and out-of-plane bending moment (Mx). The originality of this paper lies not only in the quantification of both in-plane and out-of-plane bending moment in bolts but also analyse of the preload and the flanges rigidities influence on the stress cycle on bolts in steel building frames.
2 Presentation of the experimental device
2.1 Presentation of beams used to make the flanges of the tee-stub
The tee-stubs instrumented with two bolts and used for the experimental analysis of the preload influence upon loading cycle in the bolts consist of an upper flange and a bottom flange (as shown in Fig. 1). The effect of both symmetrical and non-symmetrical tee stub configuration is investigated.
These flanges are taken from an IPE 400 beam and a HEB 320 beam used in steel construction.
The cross section dimensions of the HEB 320 and the IPE 400 are given in Table 1 and Figure 2 [15].
 |
Fig. 1 Bolted tee-stub submitted to a cyclic loading in tension. |
 |
Fig. 2 Main dimensions of the HEB 320 and IPE 400 cross section. |
2.2 Manufacture of the tee-stub flanges
All tee-stubs taken from HEB 320 and IPE 400 have the same width L equal to 70 mm (Fig. 3). This value is set while respecting the minimum distance to edge condition imposed in fatigue by Eurocode 3 [16] (e1 >1.5 d, where d is the nominal diameter of the bolt).
Plasma cutting (Fig. 4a) is used beforehand in order to cut the initial beams in two parts, which are then cut transversely with a band saw (Fig. 4b) to obtain the 70 mm wide flanges.
Finally, the holes in the flanges are drilled to be able to pass the instrumented bolts. For this, the drilled holes diameter is 2 mm larger than the bolt shank diameter. The bolt used for the experimental campaign are HR M12 bolts of 10.9 quality class. In order to evaluate if bolts location has an impact on the failure mode and the bolt stress distribution for various preload values, two different bolts center distances are studied in this experimental campaign, 112 and 142 mm (Tab. 2).
A 16 mm diameter hole (Fig. 5) is drilled in the web of tee-stub. This hole is used for mounting the samples on the tensile machine via a pin as seen in Figure 6.
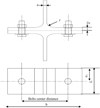 |
Fig. 3 Tee-stub geometrical parameters. |
 |
Fig. 4 The different stages of making the flanges of the tee-stub. |
Dimensional characteristics of the tee-stubs.
 |
Fig. 5 Tee-stub flanges prepared for experimental tests. |
 |
Fig. 6 The mounting of the tee-stub on the testing machine. |
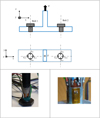 |
Fig. 7 Strain gauges location upon the bolts. |
 |
Fig. 9 Special washer located under the screw head. |
 |
Fig. 9 Montage du tronçon en té sur la machine d’essai. |
2.3 Bolt instrumentation
The assembly bolts are equipped with strain gauges (CEA [17]) placed in the longitudinal direction. Each bolt is instrumented with 4 strain gauges arranged along each generatrix around the bolt shank as shown in Figure 7. The strain gauges noted JLE1, JLI1, JG1 and JD1 allow to measure the strains in bolt number 1. The strain gauges noted JLE2, JLI2, JG2 and JD2 are used to measure the strains in bolt 2.
The bolts are submitted to bending stresses inside the tee-stub. Thus, by applying the principle of superposition (Fig. 8) on a diameter of the bolts, the tensile stresses allowing to deduce FB are separated from the bending stresses allowing to calculate My (bending moment in-plane) and Mx , the out-of-plane bending moment that is to say the bending around the minor axis (x axis in Fig. 7) of the tee-stub.
The axial force FB in the bolt is evaluated from the average strain given by the four strain gauges of each bolt.
 (1)
(1)
where:
A is the nominal screw section
εi are the measured strains,
E is the Young modulus
This axial force FB is used to highlight the influence of the preload on the stress cycle upon the bolts.
The bending moments Mx and My for each bolt are evaluated using the following equations:
 (2)
(2)
 (3)
(3)
where :
d is the nominal screw diameter.
The bending moment Mx was assessed to see if out-of-plane bending was present. A special washer described in Figure 9 has been manufactured in order to pass the strain gauge wires.
The total test set up is shown in Figure 6.
The machine is an MTS 810 uniaxial servo-hydraulic machine with a maximum capacity of ±100 kN. It can be used for fatigue tests but also for monotonic traction or compression tests. Two strain gauge bridges are placed nearby to measure the strains of each bolt strain gauges (Fig. 10). Bolts tightening were carried out by a manual torque wrench.
The tensile tests are carried out on the six geometric configurations of the tee-stub listed in Table 3. Two flange thicknesses are chosen. Hence, the first two cases are considered to be rigid tee-stub because the flanges (upper flange and lower flange) are thick (HEB 320 beam). The following two cases correspond to the flexible tee-stub since the flanges come from the IPE 400 beam. Cases 5 and 6 are intermediate cases with one rigid flange and the other flexible.
The external force (F) applied by the traction machine to the assembly varies from 0 kN to 20 kN. The eight relative deformations on both strain gauges are recorded for the different load levels.
 |
Fig. 10 The tee-stub and both measurement strain gauges bridges. |
Tee-stubs configurations.
3 Results and discussion
3.1 Relative strains and axial load in bolts
The bolt preload (FP) is applied by tightening. The desired preload value is set from the strains obtained with the strain gauges using the Hooke’s law.
 (4)
(4)
where:
As : resistant area of the thread part of the bolt,
E : Young’s modulus,
ε : mean value of the longitudinal strain.
Figure 11 presents the evolution of the strains measured by the four strain gauges in each bolt for a monotonic tensile test in the case 1 without preload in the bolt.
The main observation made from Figure 11 is that both bolts 1 and 2 exhibit global tension combined with bending, as interior fibers (LI) appear more strained compared to the exterior fibers (LE). However, the differences between left and right fibers remain small, which implies that there is a small or negligible out of plane bending. Therefore, Figure 12 shows, for a monotonic tensile test, the evolution of the axial force FB in the bolt as a function of the external force applied for three preload conditions : without preload (FP = 0 kN), 10 kN and 20 kN preload value.
In all cases presented in Figure 12, the force FB in each bolt is greater than the half of the applied external force due to the presence of a prying force Q (FB = 0.5 F + Q) [2,3]. In fact, in the absence of prying force, that is in the case of a rigid flange, each bolt is submitted to half of the external force F (FB = 0.5 F). In Figures 12b and 12c where a preload is applied, the bolts begin to be stressed by the external force F only when it exceeds the value of the contact pressure created between the flanges of the tee-stub. Among the six geometric configurations studied (Fig. 12), the axial force FB is greater in cases 3 and 4 which are the most flexible cases and it is smaller in the rigid cases namely cases 1 and 2. This observation is consistent because the more flexible flange, the greater is the prying force. Indeed, the prying force depends on the flange stiffness. This stiffness can also create more or less important bending moments in bolts.
 |
Fig. 11 Evolution of the eight relative strains as a function of the external force F applied to the tee-stub. |
 |
Fig. 12 Evolution of the axial force FB in the bolt as a function of the external force (F) applied. |
3.2 Bending moments in bolts
The test results permit to observe the existence of bending moments in the bolt. These latter are in-plane bending (My) and out-of-plane bending (Mx) and are assessed using equations (2) and (3). The bending moment in the plane (My) is related to the usual behavior of a tee-stub. It is larger as the flanges of the tee-stub are more flexible as shown in Figures 13a, 14a, 15a and 16a. For a 20 kN external force, the maximum in-plane bending moment (My) is obtained for case 3 (My = 50 N.m) which is the most flexible case and the minimum in-plane bending moment (My) is obtained for the case 2 (My = 12 N.m). This trend is also checked for the other values of the external force F (5 kN, 10 kN and 15 kN). Bending moments are also noticed in bolts even before the application of the external force F as highlighted by the values of the in plane bending moment (My) and the out-of-plane bending moment (Mx) for F = 0 kN. This is explained contact faces not perfectly plane. Indeed, during the bols tightening, the surfaces in contact seek to unite perfectly by exerting forces on the bolts. These result in the bending moment of the bolts before the application of the external force F.
The existence of an out-of-plane bending moment (Mx) in the bolts has also been observed. This bending moment appears as soon as the bolts are tightened and changes very slightly with the application of the external force F in the as shown Figures 13b, 14b, 15b and 16b. Thus, this parasitic moment Mx can therefore have three possible origins. It can be linked to the used tightening method, to the non-flatness of the contact surfaces of the flanges or to alignment default of the bolt axes with the axis of application of the external force F. To find the origin of this out-of-plane moment (Mx), a tee-stub with four bolts (Fig. 17) is studied in the most flexible configuration (case 3). This new assembly with four bolts should allow to considerably reduce the out-of-plane moment Mx if the origin of the latter in the case of a tee-stub with two bolts is a problem with the axes alignment.
The analysis of the results obtained with four bolts (Fig. 18) shows the total absence of out-of-plane moment (Mx = 0 N.m). The only measured bending moment in bolts is in-plane bending moment (My). Thus, the out-of-plane moment obtained in the case of a tee-stub with two bolts is linked to the design or to the manufacturing process, inducing an alignment default between the axis of both bolts and that of applied force.
 |
Fig. 13 Bolts bending moments in case 1. |
 |
Fig. 14 Bolts bending moments in case 2. |
 |
Fig. 15 Bolts bending moments in case 3. |
 |
Fig. 16 Bolts bending moments in case 4. |
 |
Fig. 17 Tee-stub with four bolts in the flexible case (case 3). |
 |
Fig. 18 Evolution of strains and the bending moments in bolts with 10 kN preload in the case of the flexible tee-stub with four bolts. |
3.3 Influence of the preload on the loading cycle encountered by the bolt
The analysis of the influence of the preload on the loading cycle encountered by the bolt is carried out by applying an external loading cycle varying from 0 kN to 20 kN as shown in Figure 19.
A stress cycle is defined by its amplitude (σa) and its mean value (σm) as shown in Figure 20a. The amplitude (σa) of the stress cycle is the main cause of fatigue failure. The uniaxial fatigue life as defined in Eurocode 3 part 1–9 [16] depends on the stress amplitude. However, multiaxial fatigue behavior investigation needs multiaxial fatigue criteria such as that of Zenner [18] and Dang Van [19,20]. They are expressed as a function of the stress amplitude and the mean value of the stress (σa, σm). The fatigue phenomenon is indeed directly sensitive to the amplitude and the mean values of all the components of the stress tensor, [16,18,19,21]. Both parameters (stress amplitude and mean value) are calculated from the maximum (σmax obtained for F = 20 kN) and minimum (σmin obtained for F = 0 kN) stresses at the same location on the bolt during the loading cycle. The stress cycle in bolts for each of the six studied configurations (Tab. 3) is shown in Figure 20b-c. Four preload values (FP) have been studied: 0 kN, 10 kN, 20 kN and 40 kN corresponding respectively to 0%, 10%, 20% and 40% of the elastic limit specific to bolts used for this experimental campaign.
It can be seen in Figure 20 and Tables 4 and 5 that for the six studied configurations with the same applied loading cycle, a strong decrease in the amplitude (σa) in the bolt as the preload force increases except in the case 3 corresponding to the most flexible case as the flanges are taken from the IPE400 beam with the greatest distance between bolts (142 mm). Furthermore, as the amplitude decreases, it can be observed that the mean stress value (σm) increases. According to Table 4, the stress amplitudes are greater when the tee-stub is flexible (cases 3 and 4) and smaller when it is rigid (cases 1 and 2) for all preload values. The percentages of reduction due to the preload (Tab. 5) are greater for rigid cases (cases 1 and 2) and smaller in flexible cases (cases 3 and 4). For example, from 10 kN to 20 kN of preload, the stress amplitude σa decreases by 68% in case 1, by 87.9% incase 2, by 5.4% in case 3, by 38.7% in case 4, by 45.2% in case 5 and by 45.2% in case 6.
 (5)
(5)
The amplitude of the stress σa (even τa) is the main damaging fatigue factor (6) to the structure in service [16,18,19,22], its reduction makes it possible to lower the fatigue damage E and thus to grow longer the fatigue life of the bolt as evidenced by the formalism of multiaxial fatigue criteria specifically Zenner’s criterion [18].
This multiaxial fatigue criterion defines its material plane damage indicator by:
 (6)
(6)
The criterion involves two terms related to the shear stress (τha et τhm ) and two others related to the normal stress (σhha et σhhm) acting on the plane which unit normal vector is h.
τha and τhm are the amplitude and the mean value respectively of the shear stress acting on material plane oriented by h, σhha and σhhm are the amplitude and the mean value of the normal stress acting on the considered plane.
The fatigue function of the criterion is established as a quadratic mean value of the damage indicator Eh all over the possibly oriented material planes. Practically it gives:
 (7)
(7)
where S = 2π and dS = sin ϫdϕ dϫ.
The criterion formulation includes four constants that are denoted as azn, bzn, mzn, nzn and are established from four fatigue limits (fully reversed and repeated tension and torsion fatigue limits: σ-1 and τ-1, σ0 and τ0).
It is clearly seen through the formulation of Zenner’s multiaxial fatigue criterion that the reduction of the alternating part of the stress (σa and τa) strongly reduces the damage indicator Eh and then the fatigue function Ezn. This reduction of the stress amplitude leads to an improvement in the fatigue strength of the bolt resulting in the increase in the fatigue life since the fatigue damage is inversely proportional to the fatigue life as shown in Figure 21 [22].
Therefore, through this experimental campaign, the beneficial effect of the preload upon the stress cycle encountered by the bolt then on the fatigue strength of bolts is highlighted.
In addition, the amplitude and the mean value of the stress are greater in case 3 corresponding to the most flexible configuration of the tee-stub. They are smaller for case 2 corresponding to the most rigid case.
For the bolts of the tee-stub to have a long fatigue life, the flanges of the tee-stub must be rigid and one must apply sufficient preload on bolts without over-tightening them to prevent their damage.
 |
Fig. 19 External loading cycle (F) applied to the tee-stub. |
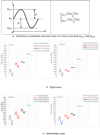 |
Fig. 20 Evolution of the stress cycles in the bolts as a function of the preload. |
Stress amplitude σa as a function of the preload.
Reduction percentage of the stress amplitude σa.
 |
Fig. 21 Influence of the preload upon the fatigue function and the fatigue life according to Zenner’s multiaxial fatigue criterion [22]. |
4 Conclusion
The experimental analysis of the tee-stub led to instrument the bolts with longitudinal strains gauges to quantify, on the one hand, the axial force in the bolts FB and on the other hand, to quantify the in plane bending moment My and the out-of-plane bending moment Mx from the measured relative micro-strains . The out-of-plane bending moments in the case of tee-stub with two bolts results from an alignment default between the axis of both bolts with the axis of application of the force. It has been demonstrated through the analysis of a tee-stub with four bolts where the measured out-of-plane bending moments are all equal to zero.
These tests also show that the contact faces of the flanges of the tee-stub obtained from IPE and HEB beams are not perfectly plane. That is why a bending moment in bolts even before applying the external force F is observed (up to 30 N.m for the in plane bending moment My and up to 15 N.m for the of out-of-plane bending moment Mx). To avoid this parasitic bending moment in the future on similar two bolt tee-stub tests, treating the surfaces that will be in contact is recommended so that they become perfectly plane.
Despite the existence of out-of-plane bending, the beneficial effect of the preload upon the stress cycle encountered by the bolt has been shown through this experimental campaign. Indeed, the stress amplitudes reduction is 36.3% from 0 kN to 10 kN of preload, 47.3% from 10 kN to 20 kN of preload and up to 60.4% from 20 kN to 40 kN of preload. In addition, the stress amplitudes has been measured higher when the tee-stub is flexible and smaller when it is rigid but the percentages of reduction due to the preload are greater for rigid cases, up to 54% (average reduction in case 1) and smaller in flexible ones. For example, the average reduction in case 3 (most flexible case) is 14.7%. Therefore, to improve the fatigue strength of the bolts in a steel portal frame structure it is interesting to have rigid flanges and to apply sufficient preload on bolts without over-tightening them to prevent their damage.
Declaration of conflicting interest
The authors have nothing to disclose.
Data availability statement
The authors confirm that the data supporting the findings of this study are available within the article. Raw data that support the findings of this study are available from the corresponding author, [ABC], upon reasonable request.
Funding
This research received no external funding
Author contribution statement
Conceptualization, Aliou Badara Camara, Fabienne Pennec, Sébastien Durif, Jean-Louis Robert and Abdelhamid Bouchaïr;
Methodology, Aliou Badara Camara and Jean-Louis Robert;
Visualization, Aliou Badara Camara;
Formal Analysis, Aliou Badara Camara, Fabienne Pennec, Sébastien Durif, Jean-Louis Robert and Abdelhamid Bouchaïr;
Investigation, Aliou Badara Camara and Jean-Louis Robert;
Writing- Original draft preparation, Aliou Badara Camara;
Writing − Review & Editing, Aliou Badara Camara and Jean-Louis Robert;
Review, Fabienne Pennec, Sébastien Durif, Jean-Louis Robert and Abdelhamid Bouchaïr;
Validation, Aliou Badara Camara, Fabienne Pennec, Sébastien Durif, Jean-Louis Robert and Abdelhamid Bouchaïr;
Supervision, Fabienne Pennec, Sébastien Durif, Jean-Louis Robert and Abdelhamid Bouchaïr;
Acknowledgments
We would particularly like to thank Mr. Stéphane LEPETIT, manager of the CANCE Company, a Metal Construction company in Montluçon, for providing us with all the raw materials (IPE 400, HEB 320 beams and bolts) necessary for the experimental campaign.
References
- M. Saranik, L. Jézéquel, D. Lenoir, Experimental and numerical study for fatigue life prediction of bolted connection, Proc. Eng. 66, 354–368 (2013) [CrossRef] [Google Scholar]
- EN 1993-1-8 - Eurocode 3: Design of steel structures - Part 1-8: Design of joints, European Standard, vol. 33, pp. 1-135 (2005) [Google Scholar]
- P. Zoetemeijer, A design method for the tension side of statically loaded, Bolted beam-to-column connections, HERON, vol. 20, pp.1- 59 (1974) [Google Scholar]
- Z. Al Khatab, Analyse de comportement des assemblages métalliques renforcés par contre-plaques - approche numérique et validation expérimentale. Thèse, Université Blaise Pascal - clermont II, pp. 1-280 (2003) [Google Scholar]
- A. Abidelah, A. Bouchaïr, D.E. Kerdal, Influence of the flexural rigidity of the bolt on the behavior of the T-stub steel connection, Eng. Struct. 81, 181–194 (2014) [CrossRef] [Google Scholar]
- C.P. Chasten, Theoretical modeling and testing of 8 − bolt extended end-plate connections. Thesis, pp. 1–63 (1988) [Google Scholar]
- L.M. Bezerra, C.S. De Freitas, W.T. Matias et al., Evaluación numérica del efecto del espesor de la placa de contactoen la acción de palanca en conexión de acero tipo T, Rev. Int. Metod. Numer. para Calc. Disen. en Ing. 30, 11–19 (2012) [Google Scholar]
- R. Bai, S.L. Chan, J.P. Hao, Improved design of extended end-plate connection allowing for prying effects, J. Constr. Steel Res. 113, 13–27 (2015) [CrossRef] [Google Scholar]
- A. Ahmed, R. Hasan, Effect and evaluation of prying action for top- and seat-angle connections, Int. J. Adv. Struct. Eng. 7, 159–169 (2015) [CrossRef] [Google Scholar]
- L.A. Ciutina, Assemblages et comportement sismique de portiques en acier et mixtes acier − beton: experimentation et simulation numerique. Thèse, Institut National des Sciences Appliquées de Rennes, pp. 1-306 (2003) [Google Scholar]
- Y. Fares, Dimensionnement en fatigue des assemblages boulonnés à l’aide de critères de fatigue multiaxiale. Thèse, Institut National des Sciences Appliquées de Toulouse, pp. 1-215 (2006) [Google Scholar]
- J. Wang, B. Uy, D. Li et al., Fatigue behaviour of stainless steel bolts in tension and shear under constant-amplitude loading, Int. J. Fatigue, 133, pp. 1-13 (2020) [Google Scholar]
- H. Bartsch, B. Hoffmeister, M. Feldmann, Fatigue analysis of welds and bolts in end plate connections of I-girders, Int. J. Fatigue 138, pp. 1-15 (2020) [Google Scholar]
- Y. Liu, J. Chen, X. Zhang et al., Fatigue behaviour of blind bolts under tensile cyclic loads, J. Constr. Steel Res. 148, 16–27 (2018) [CrossRef] [Google Scholar]
- ArcelorMittal, Profilés et aciers marchands − sections and merchant bars, 2007, p. 238 [Google Scholar]
- EN 1993-1-9 - Eurocode 3: Design of steel structures - Part 1-9: Fatigue, European Standard, vol. 33, pp. 1-37, (2005) [Google Scholar]
- Vishay Micromesures France, Jauges d’extensometrie electrique : comment choisir une jauge d’extensomètrie, NT 505B, p. 16 [Google Scholar]
- J. Liu, H. Zenner, Berechnung der Dauerschwingfestigkeit bei mehrachsiger Beanspruchung Teil 1, Materwiss. Werksttech. 24, 240–249 (1993) [CrossRef] [Google Scholar]
- K. Dang Van, A. Le Douaron, H. P. Lieurade, Multiaxial fatigue limit: a new approach, Proceedings of the 6th International Conference on Fracture (ICF6), New Delhi, India, 4–10 December 1984, pp. 1879-1885 (1984) [Google Scholar]
- K. Dang Van, O. Griveau, B Message, On a new multiaxial fatigue limite criterion: theory and application, Proceedings of the International Conference on Biaxial/Multiaxial Fatigue, University of Sheffield, pp. 479–496 (1989) [Google Scholar]
- B. Weber, B. Kenmeugne, J.C. Clement et al., Improvements of multiaxial fatigue criteria computation for a strong reduction of calculation duration, Comput. Mater. Sci. 15, 381–399 (1999) [CrossRef] [Google Scholar]
- A.B. Camara, Analyse du comportement en fatigue d’assemblages boulonnés. Thèse, Université Clermont-Auvergne, pp. 1-201 (2019) [Google Scholar]
Cite this article as: Aliou Badara Camara, Fabienne Pennec, Sébastien Durif, Jean-Louis Robert, Abdelhamid Bouchaïr, Experimental study of both bending moment and preload effect on the stress cycle upon bolts in a tee-stub, Matériaux & Techniques 111, 404 (2023)
All Tables
All Figures
 |
Fig. 1 Bolted tee-stub submitted to a cyclic loading in tension. |
| In the text | |
 |
Fig. 2 Main dimensions of the HEB 320 and IPE 400 cross section. |
| In the text | |
 |
Fig. 3 Tee-stub geometrical parameters. |
| In the text | |
 |
Fig. 4 The different stages of making the flanges of the tee-stub. |
| In the text | |
 |
Fig. 5 Tee-stub flanges prepared for experimental tests. |
| In the text | |
 |
Fig. 6 The mounting of the tee-stub on the testing machine. |
| In the text | |
 |
Fig. 7 Strain gauges location upon the bolts. |
| In the text | |
 |
Fig. 9 Special washer located under the screw head. |
| In the text | |
 |
Fig. 9 Montage du tronçon en té sur la machine d’essai. |
| In the text | |
 |
Fig. 10 The tee-stub and both measurement strain gauges bridges. |
| In the text | |
 |
Fig. 11 Evolution of the eight relative strains as a function of the external force F applied to the tee-stub. |
| In the text | |
 |
Fig. 12 Evolution of the axial force FB in the bolt as a function of the external force (F) applied. |
| In the text | |
 |
Fig. 13 Bolts bending moments in case 1. |
| In the text | |
 |
Fig. 14 Bolts bending moments in case 2. |
| In the text | |
 |
Fig. 15 Bolts bending moments in case 3. |
| In the text | |
 |
Fig. 16 Bolts bending moments in case 4. |
| In the text | |
 |
Fig. 17 Tee-stub with four bolts in the flexible case (case 3). |
| In the text | |
 |
Fig. 18 Evolution of strains and the bending moments in bolts with 10 kN preload in the case of the flexible tee-stub with four bolts. |
| In the text | |
 |
Fig. 19 External loading cycle (F) applied to the tee-stub. |
| In the text | |
 |
Fig. 20 Evolution of the stress cycles in the bolts as a function of the preload. |
| In the text | |
 |
Fig. 21 Influence of the preload upon the fatigue function and the fatigue life according to Zenner’s multiaxial fatigue criterion [22]. |
| In the text | |
Current usage metrics show cumulative count of Article Views (full-text article views including HTML views, PDF and ePub downloads, according to the available data) and Abstracts Views on Vision4Press platform.
Data correspond to usage on the plateform after 2015. The current usage metrics is available 48-96 hours after online publication and is updated daily on week days.
Initial download of the metrics may take a while.


